Steps to configure Smart Bundles
In order to create a product bundle, please follow these steps:
Step 1: Create a new product
Click on Products >> Add New.

Step 2: Choose “Smart bundle”

Choose Smart bundle from the drop-down of product type.

Step 3: Search for product(s)

On Bundled Products tab, type in the Search box with keyword(s) to look for products.
Step 4: Select product types
Choose an appropriate type then click (+) to add. Notice the marks at the end of each item:
- simple #…: simple product
- variable #…: variable product
- variation #…: a specific variation of the variable product above it.

Variable products and variations are only available in the Premium version
If you would like to search for specific produc types only, you can click on the Settings button and hold down the Ctrl button to choose some:

Step 5: Re-arrange the items
Use the arrow drag & drop symbol to rearrange the order of items:

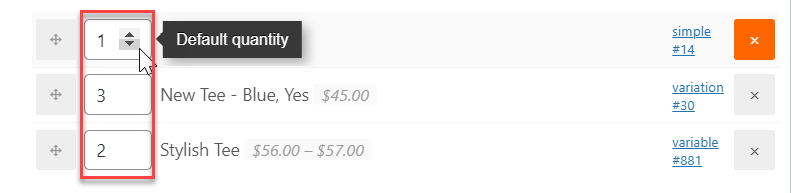
Step 6: Set default quantity & min/max
Fill in the default quantity box for each item. By default, when a new product is added to the bundle, the default quantity is 1.
If you want your customers to choose the unit of each item to their preferences, put a check in the box “Buyer can change the quantity of bundled products” to enable the Custom quantity feature.

Clicking on the Custom quantity box will open up the min/max options. Set up the quantity limit for each item (Each item’s quantity limit) or the whole bundle (All items’ quantity limit) accordingly.
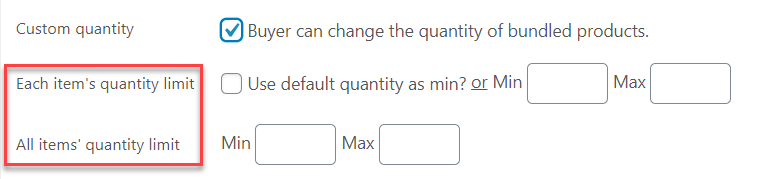
If you’d like to set different minimum quantity limits for bundled items by using the default quantities, put a check on “Use default quantity as min?”.

There will be a warning in the front-end to remind customers of how much they can buy per order.

Step 7: Configure the Pricing method
Initially, the plugin will automatically calculate the sum of all bundled products’ price and use it as the Regular price.

If you want to manually set the fixed total price for the whole bundle, click on “Disable auto-calculated price”
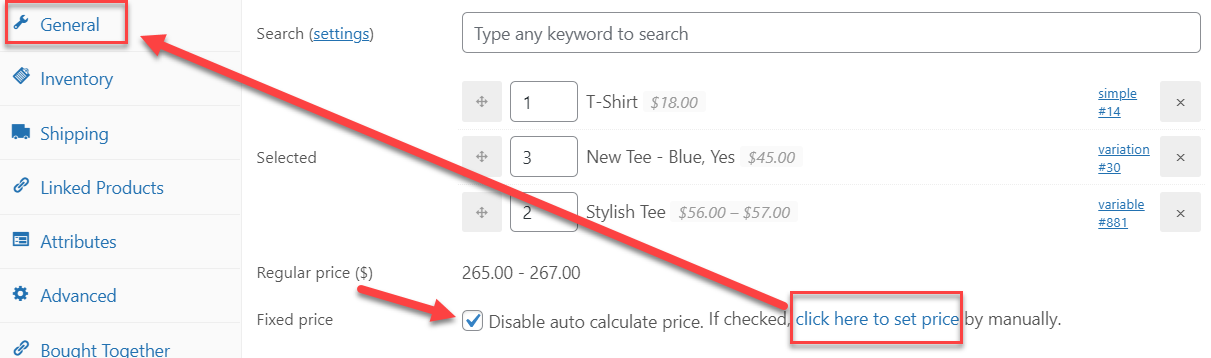
Then press “click here to set price” or go to the General tab and fill in with a new price:

Step 8: Configure the Discount

Type in a discount on the corresponding box to set it up as a percentage or amount discount. Note that the Discount option will be disabled when you disable the auto-calculated price and enter a manual total price for the bundle.
If both these boxes are filled, the amount discount will be prioritized and applied to sub-products:

Step 9: Configure the Total limits

If the package you’re creating has some limits for the total price, you can configure the min/max total limits in the coresponding box:

Step 10: Set up the Shipping fee
First, open the Shipping tab and choose a Shipping class:

Then go back to the Bundled products tab and now you can choose an option for configuring the Shipping fee. The Shipping fee will be calculated based on the chosen shipping class and applied to each product individually or for the whole bundle due to this choice.

Step 11: Configure Stock

If any of the sub-products in the list has the Stock management enabled, the Stock management for the whole bundle will be enabled as well. This means bundle doesn’t just use “In stock/Out of Stock/ On backorders” as stock status, but now the stock of the whole bundle will be tied with the item that has the lowest stock in the list. You can read more about Stocks here.
To set up a stock quantity for the whole bundle, put a check to turn on “Enable stock management at bundle level” >> Update.

Then go to the Inventory tab, put a check on “Enable the stock management at product level” and set up stock quantity for the bundle.

Step 12: Custom display price

Enter a custom display price if you want to show a price rather than the total or starting price of the bundle. For example: “From $49”.

The Custom display price will be visible only if the “Change price” option is disabled. When the Change price is enabled, the custom display price will be displayed on the archive/shop pages only.
Step 13: Above/Under text
Customize the Above/ Under text for the current bundle in bundle page to encourage buyers.

Step 14: Layout
By default, all smart bundles will use the default layout in the plugin setting under WPClever >> Product Bundles >> Layouts
You can choose a different layout for the current bundle:

Step 15: Press Publish to finish.

See this video for more information on how to create a new smart bundle.