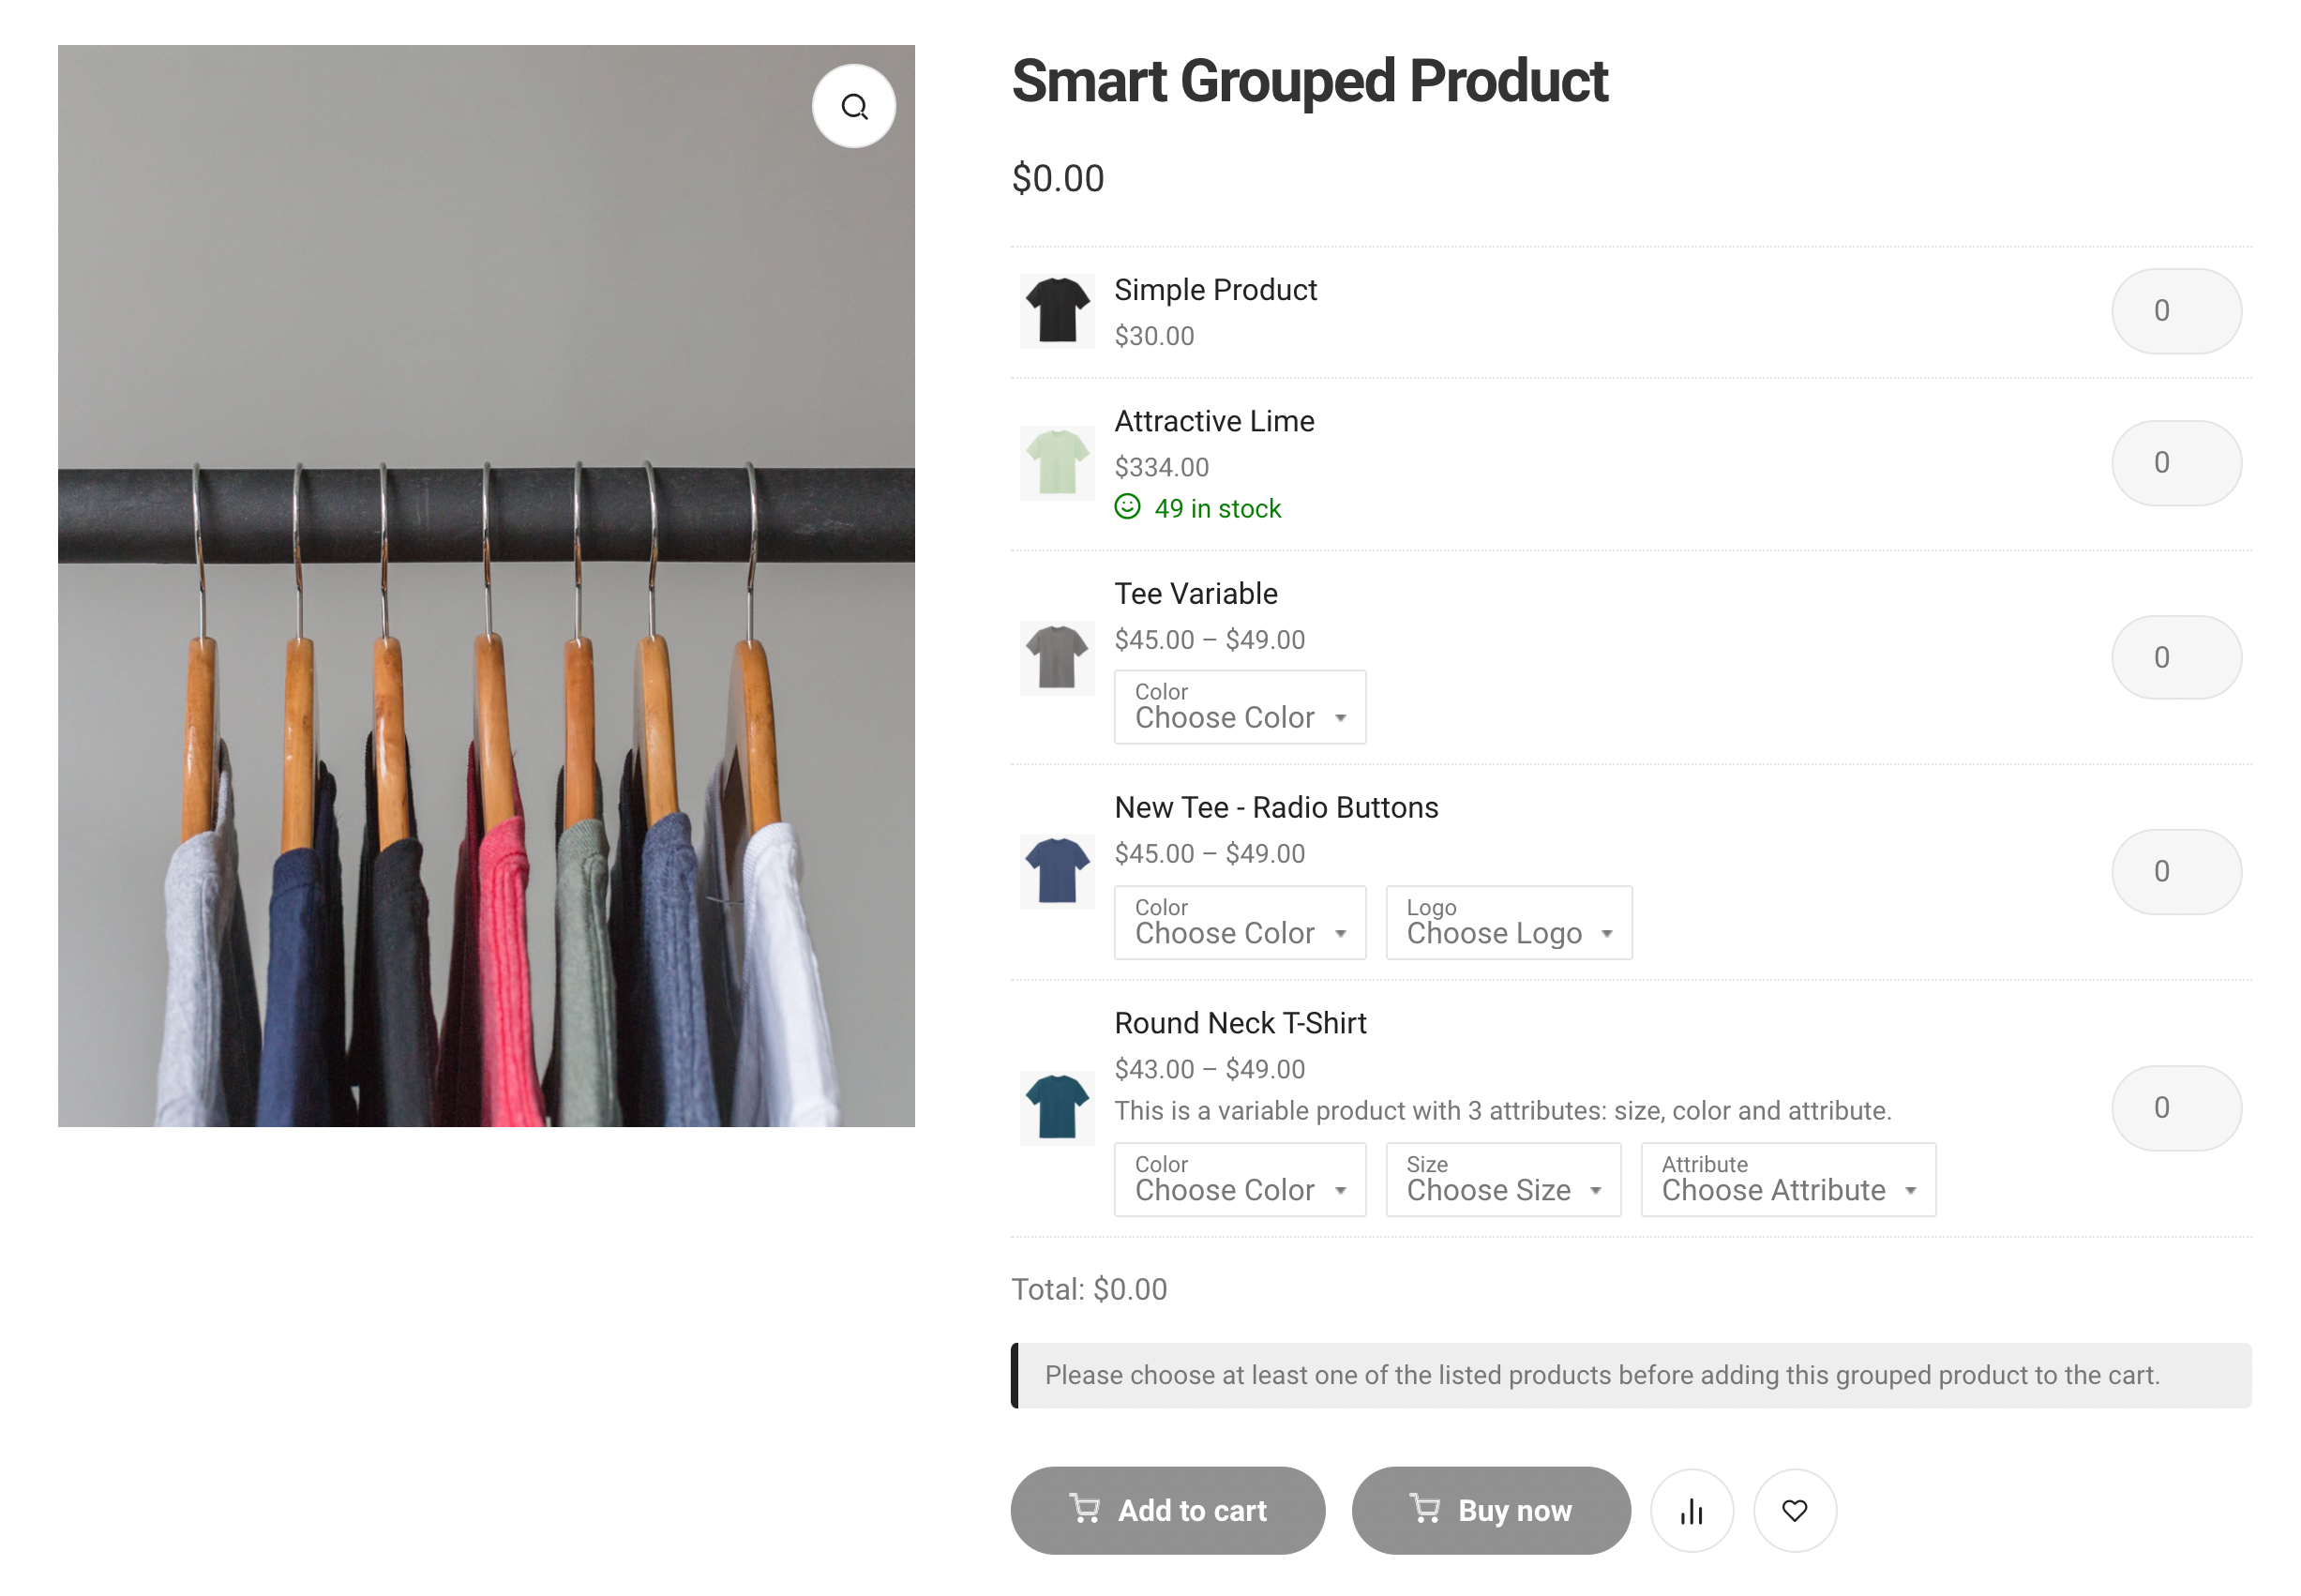
WPC Grouped Products for WooCommerce
WPC Grouped Products plugin allows users to group items to be purchased together but still remained as individual products. This plugin provides the most freedom to customers: no quantity control (min/max not applicable) & no manual pricing/ discounting method. The total of a grouped product is calculated based on the sum of chosen grouped items’ prices.
- The default quantity is possible, but no min/max limit is applied.
- The default pricing method is the auto-calculated price.

With WPC Grouped Products, simple, variable, or selected variations of some variable products can be grouped for customers’ convenience in purchasing a large number of items in a collection. Customers can adjust to any quantity or remove any item based on their preferences.
-
No manual fixed pricing, discount, or quantity (min/max) control.
-
The main product has a $0 price can be shown or hidden.
-
Grouped items stay as individual products: removed one of the grouped items or the main product from the cart won’t affect others.


Steps to create a Smart Grouped Product

Step 1: From the Product Data section, open the Grouped Products tab. Type in some words to find existing products from your store and click (+) to add to the group:
Notice the marks at the end of the product title:
- simple #…: simple product
- variable #…: variable product
- variation #…: a specific variation of the variable product above it.
Step 2: Set a default quantity for each grouped item (if any). These quantities are not fixed or min/max. It’s just a suggesting quantity for customers.
Step 3: Configure the Above/Under text if any to encourage buyers.
Step 4: Open the General tab, fill in a price for the Add to Cart button to be enabled in the front-end.
The price you’ve put in the General tab is a nominal price, it’s not the price to be calculated when it comes to calculating the total. By default, WooCommerce requires every product to have a price in that box for the Add to Cart button to be displayed.
Step 5: If you would like to add a $0 main product, you can go to WPClever >> Grouped Product >> find the “Include main product” option then choose “Yes”. If you would like to hide this one by choosing “No” for this option >> Update Options.

Step 6: If you want to hide the general quantity box next to the Add to Cart button, please go to the Inventory tab to enable the “Sold Individually” option for your product. When this option is enabled, each customer can buy only 1 such deal per order per customer. Skip this step if you do not wish to do that.

Step 7: Press Publish. Your Grouped product is now ready for sale.
Plugin Settings
1/ General settings:
Price format: This is how the price of Grouped products appears in the shop archive (not for grouped product page).
- Normal price: Only the prices are displayed, for example: $45.
- From price: Prices of Grouped product in shop archive will have this format: From $45.
- None: No price is displayed.
You can hide the price of Smart Grouped in the shop archive by choosing “None” for this option.

2/ Grouped product page details:

Position: Configure a place for showing the list of grouped items on the product page.
Variation selector: Use the default drop-down interface or use WPC Variations Radio Buttons plugin to set up the ddSlick, HTML select tag, Select2, or Radio Buttons interface.
Show thumbnail: choose “Yes” to show the thumbnail of grouped items. Choose “No” to hide them.
Show short description: choose “Yes” to show the short description of grouped items. Choose “No” to hide them.
Show price: choose “Yes” to show the prices of grouped items. Choose “No” to hide them.
Show plus/minus buttons: choose “Yes” to show a pair of + – buttons for the quantity selector of each grouped item. Choose “No” to hide them.

Link to individual products:
- If you choose “Yes, open in the new/same tab”, customers can click on each grouped item’s product title to visit the individual product page in the same or new tab.
- If you choose “Yes, open in the quick view popup”, you must first install the WPC Smart Quick View plugin.
- If you choose “No”, customers won’t be able to see the grouped item’s product page.

Note: If you would like to completely unlink individual products from Smart Grouped product, you need to choose “No”, then on the individual product page, adjust the Catalog Visibility to “Hidden from search and shop archive”. Don’t adjust the Visibility to Private, your customers won’t be able to see that product on the Grouped product page.
Change image: If “Yes” is chosen, when customers choose a variation of a variable grouped product, its thumbnail will replace the main product’s image. Choose “No” to disable this.
Change price: Choose “Yes” to make the price changes as customers choose a quantity. If your site uses a special structure, you can choose “Yes, custom selector”.
Total text: Enter a new text for the total based on your preference here.
3/ Add to Cart button labels:
You can change the wording for labels and other alert texts in the Localization tab under WPClever >> Grouped Product.

4/ Search settings:

Search limit: choose a limit for search results. You can increase/decrease the limit.
Search by SKU: choose “Yes” to enable.
Search by ID: choose “Yes” to enable.
Search exact: choose “Yes” to enable.
Search sentence: choose “Yes” to enable.
Accept same product: choose “Yes” to allow the same product to be added multiple times.
Product types: choose product types that should appear in the Search box.
Product Selector vs Variation Selector
PRODUCT SELECTOR
Users can choose a type of product selector from the plugin settings under WPClever >> Grouped Product >> Product selector.

There are 2 supported types of product selectors for Smart Grouped Products:
- Quantity: display the quantity box for each grouped item.
- Checkboxes: display the checkboxes, the quantity selector will be hidden and the default quantity of each item will be set to 1.

The chosen product selector will be applied across all Smart Grouped Products in your store. You can also set distinctive product selector for individual Smart Grouped Products in their single product pages: Open the Grouped products tab >> Product Selector then choose a type:

VARIATION SELECTOR
As its name implies, the Variation Selector option is for choosing a selector for variable products within Smart Grouped Products, not for grouped items (it’s different from the Product Selector above).
There are 2 types of variation selectors you can apply to variable grouped products:
- Default: The default variation selector offers a drop-down for each attribute of the variable products.
- WPC Variations Radio Buttons: offer 4 types of interfaces – Radio Buttons, ddSlick, Select2, and HTML Select Tag.
In order to set up a variation selector for Smart Grouped Products, please navigate to WPClever >> Grouped Products >> find the Variation selector option and choose a type. If you would like to use the interfaces from the WPC Variations Radio Buttons plugin, you must first INSTALL it then choose the mentioned option.

By default, the chosen interface under WPClever >> Variations Radio Buttons >> Variation Selector will be applied to all variable products on your site. However, if you’re using the Premium version of this plugin, you can choose a different style for individual products from the Radio Buttons tab of the Product Data section on the individual product page.
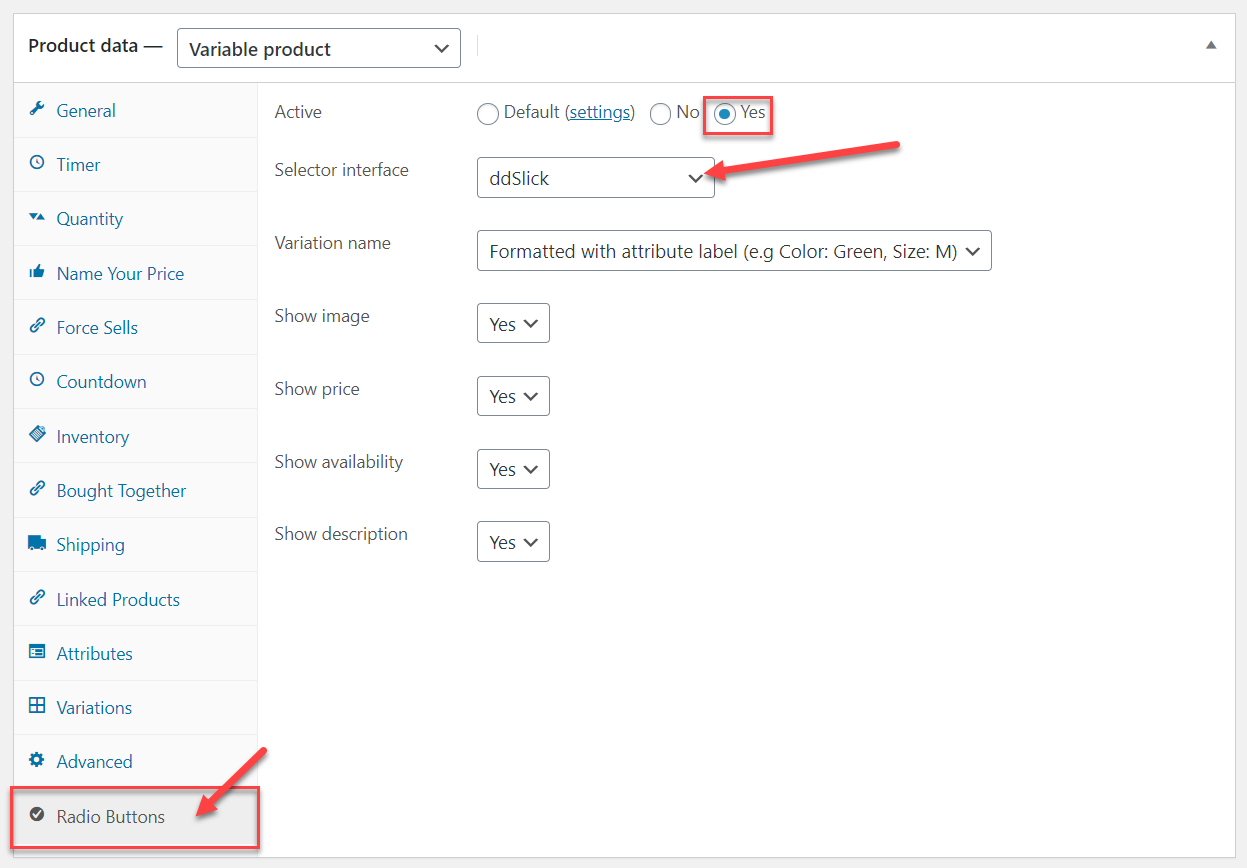
Different variable products in the same Smart Grouped Products can have different interfaces. Here’s how Radio Buttons will look on Smart Grouped Products:

For further instructions on how to use the WPC Variations Radio Buttons, you can read here.